Master menu
The master menu is the owner-wide catalog — every category, item, size, and add-on, defined once for the whole business. Stores derive their menus from it; nothing here is store-specific.
The screen
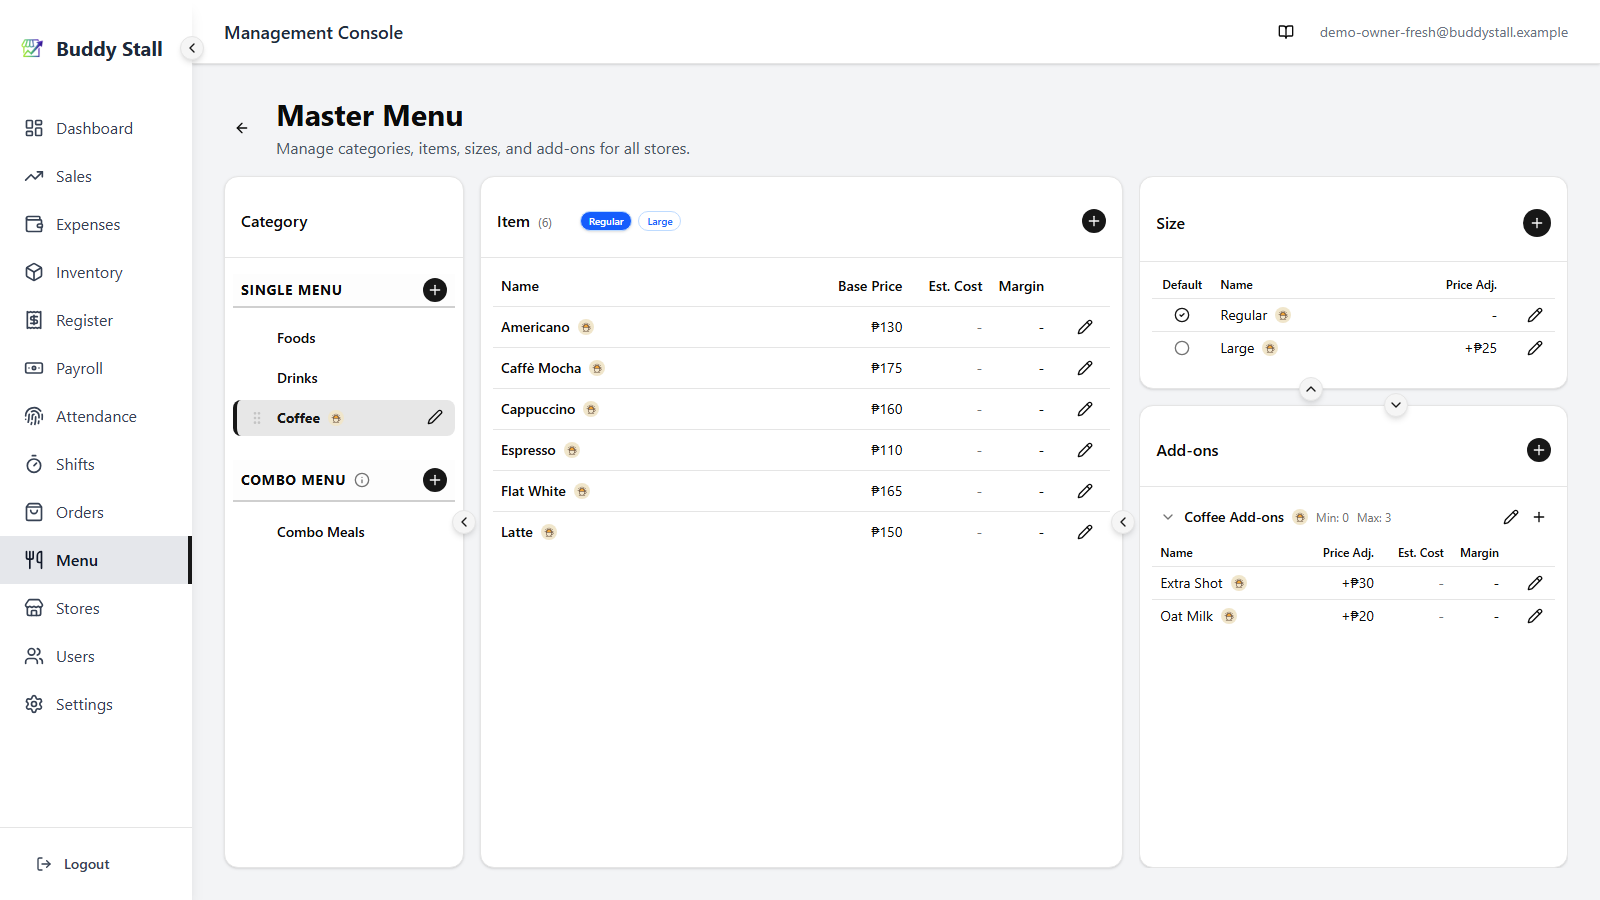
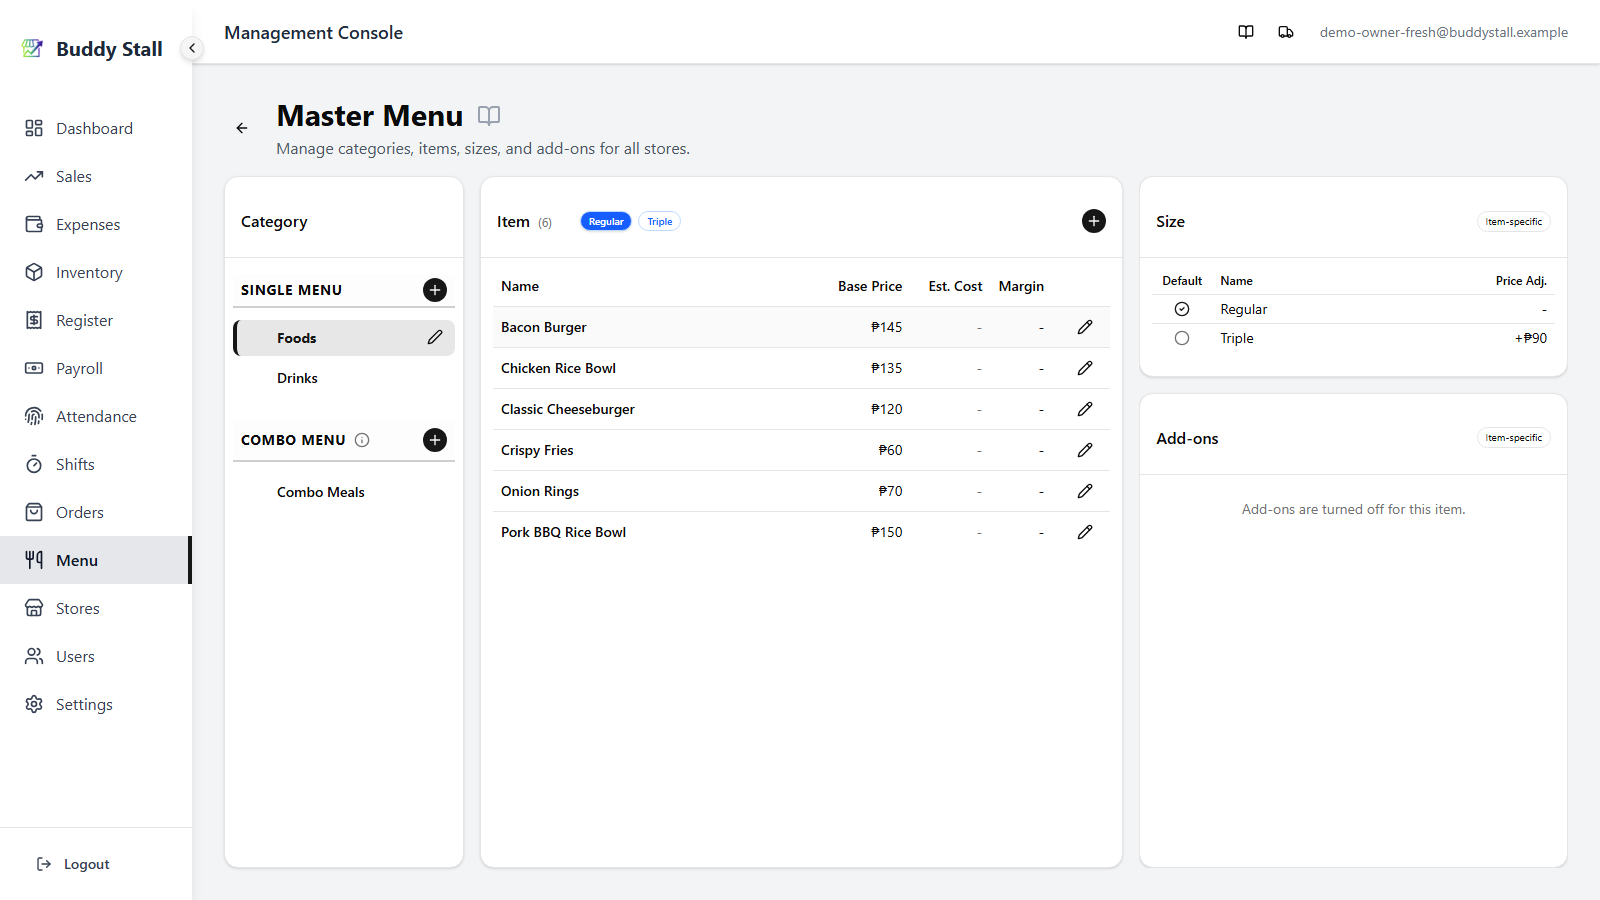
The master menu spans three columns — the right column stacks a Sizes panel on top of an Add-ons panel. Selecting a category on the left updates everything to the right.
 1234
12341 Categories — every category you have defined, split into Single Menu and Combo Menu sections.
2 Items — the items inside the category currently selected on the left.
3 Sizes — the sizes defined for that category (e.g. Regular / Large). For a combo category, both this panel and Add-ons below are replaced by Fixed Items and Selectable Items — see Combo categories below.
4 Add-ons — the add-on groups attached to that category, each with its own options.
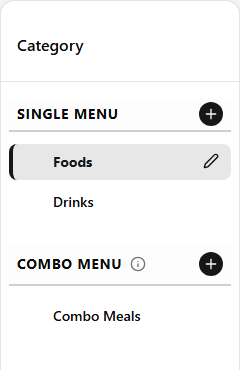
Categories
A category groups related items. Each category is one of two types, chosen when you create it and fixed thereafter:
- Single — ordinary items, each sold on its own.
- Combo — set meals, each built from other items (see Combo categories).
 12345
123451 Single Menu section — holds every category whose type is single. The header is fixed; you cannot rename or remove it.
2 Combo Menu section — holds every category whose type is combo. The + here only appears once you have at least two single categories, since a combo needs components to pull from.
3 Add a category — opens the Create Category dialog. The section you click in determines the new category's type.
4 Edit a category — opens the edit dialog. You can rename a category, but its type stays fixed.
5 Reorder — drag a category up or down to change its display order. The order set here is what the POS shows.
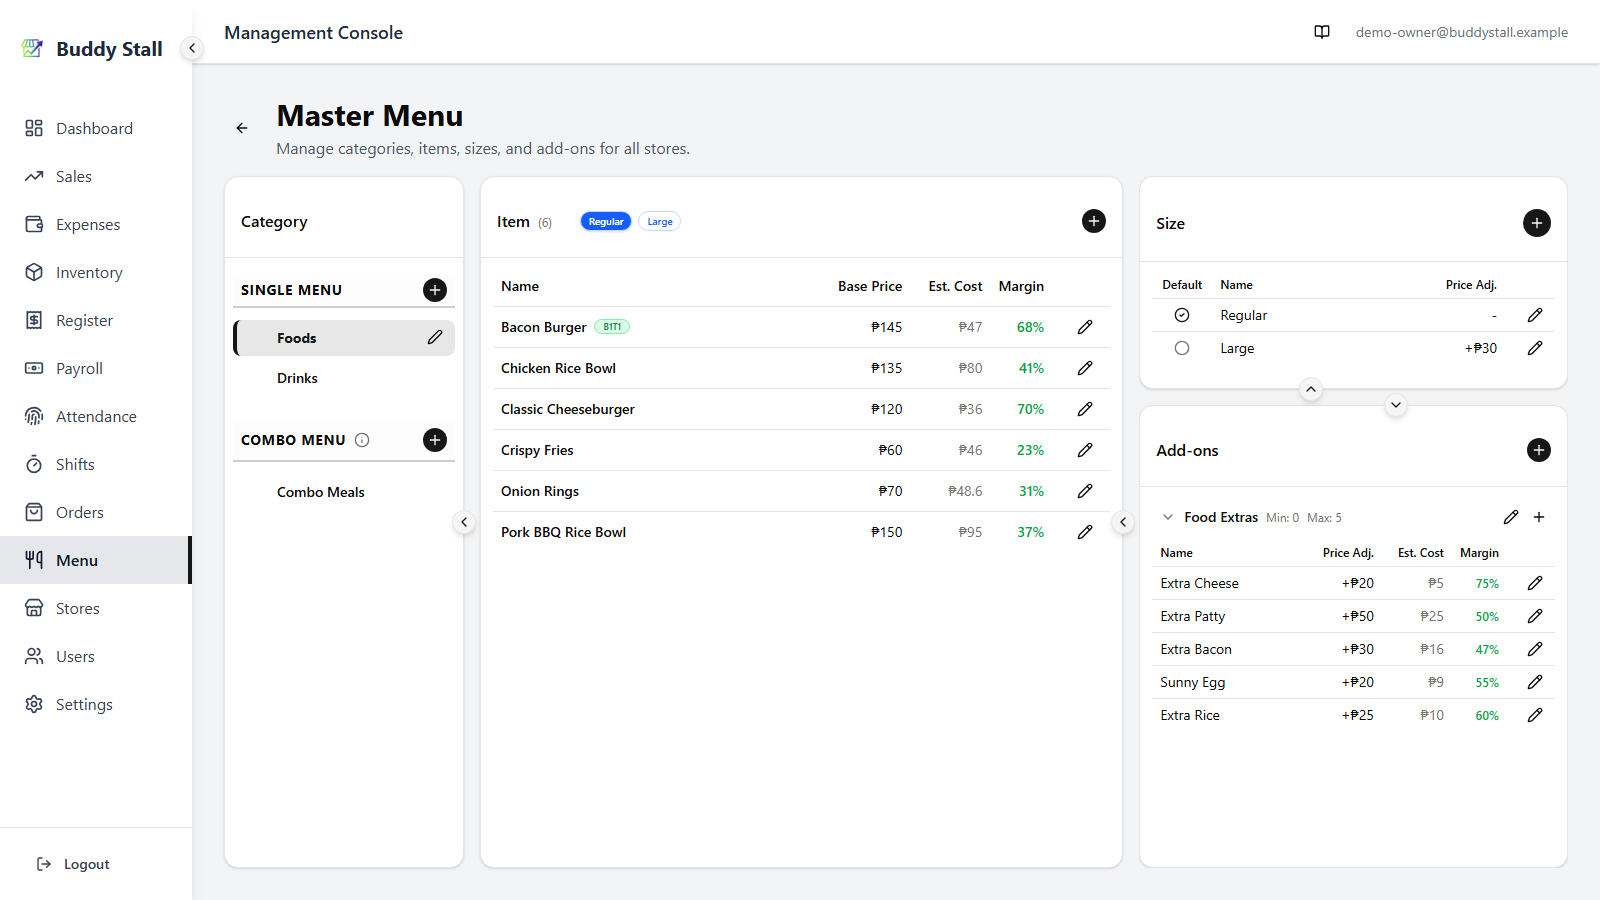
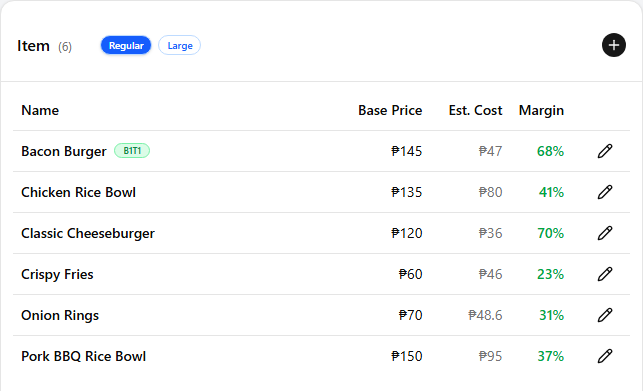
Items
Items belong to the selected category. The Items panel updates whenever you pick a different category on the left.
 12345678
1 Add an item — opens a dialog to create a new item in the selected category.
2 Size toggle — when the category has multiple sizes, these pills flip the Base Price, Est. Cost, and Margin columns between sizes so you can compare or edit per-size values in one view.
3 Name — the item's display name.
4 Base Price — the price the item sells for at the currently toggled size. Each store can override this.
5 Est. Cost — derived from the item's recipe at the currently toggled size. Empty if no recipe is set.
6 Margin — profit margin at the toggled size: (Base Price − Est. Cost) ÷ Base Price, shown as a percentage. Empty if the cost is unknown.
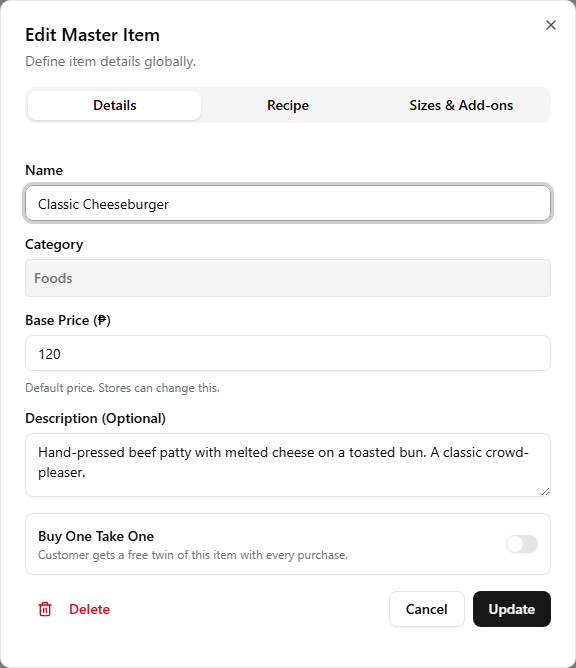
7 Buy One Take One — a green B1T1 badge marks an item set to give a free twin with every sale. Turn it on with the Buy One Take One toggle at the bottom of the item dialog's Details tab (single items only). It is the catalog-wide default: each store then chooses whether to run the promo — following the master or overriding it (see Store menu) — and the free item is added automatically at the POS (see Take orders).
8 Edit item — opens the item dialog. A single item has three tabs: Details (name, base price, description), Recipe, and Sizes & Add-ons (override the category's sizes and add-ons for this item alone). A combo item has Details and Set Contents instead. See Set up recipes, Per-item sizes & add-ons, and Combo categories below.
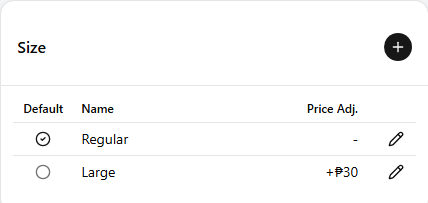
Sizes
Sizes are defined per category, so by default every item in that category offers the same set — Small / Medium / Large, for example. One size per category is marked the default; it is what the POS pre-selects. An individual item can override this set — see Per-item sizes & add-ons.
 12345
123451 Add a size — opens a dialog to create a new size in this category.
2 Default — a checkmark marks the default size. Exactly one size per category carries this; the POS picks it by default.
3 Name — the label customers see at the POS (e.g. Regular, Large).
4 Price Adj. — added on top of an item's base price when this size is chosen. The default size typically carries an adjustment of 0; larger sizes add a few pesos.
5 Edit size — opens the edit dialog to rename or re-price the size.
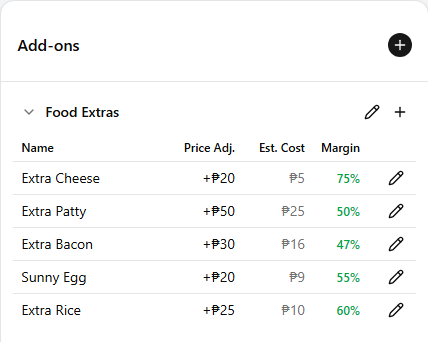
Add-ons
Add-on groups attach to a category — "Extra toppings", "Choose a drink". Each group has a name and a list of options. By default every item in the category offers the same groups, but an individual item can override which groups apply — see Per-item sizes & add-ons.
 12345678
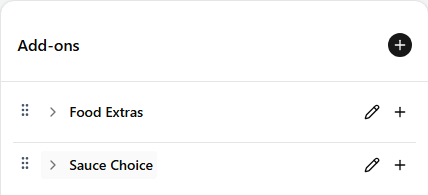
1 Add a group — opens a dialog to create a new add-on group for this category.
2 Group header — shows the group's name, an expand-collapse toggle for the options list, and an edit pencil.
3 Add an option — opens a dialog to add a new option inside this group.
4 Name — the option label customers see at the POS (e.g. Pearls, Whole Milk).
5 Price Adj. — added on top of the item price when the customer picks this option.
6 Est. Cost — derived from the option's recipe.
7 Margin — profit margin on this option: (Price Adj. − Est. Cost) ÷ Price Adj., shown as a percentage.
8 Edit option — opens the edit dialog. The Recipe tab is available only when editing an existing option, not when creating one.
Reorder groups — when a category has more than one add-on group, drag a group's header up or down to change their order. A grip handle appears on the left of the header when you hover over it. The order you set here is what the POS shows, and any item that inherits its category's add-ons follows the same order.
Per-item sizes & add-ons
By default every item inherits its category's sizes and add-on groups, so the Sizes and Add-ons panels on the right are the category's — editable and shared by every item. An item can override that for itself, without touching the rest of the category.
How an overridden item differs. Select the item and its panels change from the normal editable category view:
- A section the item customizes turns read-only and carries an Item-specific badge — it lists that item's own effective sizes or add-on groups, not the category's.
- A section the item disables reads "turned off for this item", also badged Item-specific.
- A section left on inherit is unchanged — the normal, editable category panel.
That badge is your at-a-glance sign that an item differs from its category.
One exception in a customized Add-ons panel: the item's own item-only options stay editable. Use the pencil on an option row to change its name, price, or recipe in place (the Est. Cost then reflects that recipe). The inherited category groups listed alongside them stay read-only — edit those from the category itself.
Set these per item from the item dialog's Sizes & Add-ons tab — the setup walkthrough covers the steps.
Combo categories
When a category's type is combo, its items are set meals built from other items. The combo is sold and priced as a single item.
Selecting a combo category swaps the right column — Sizes and Add-ons are replaced by the combo item's Set Contents, split into two panels.
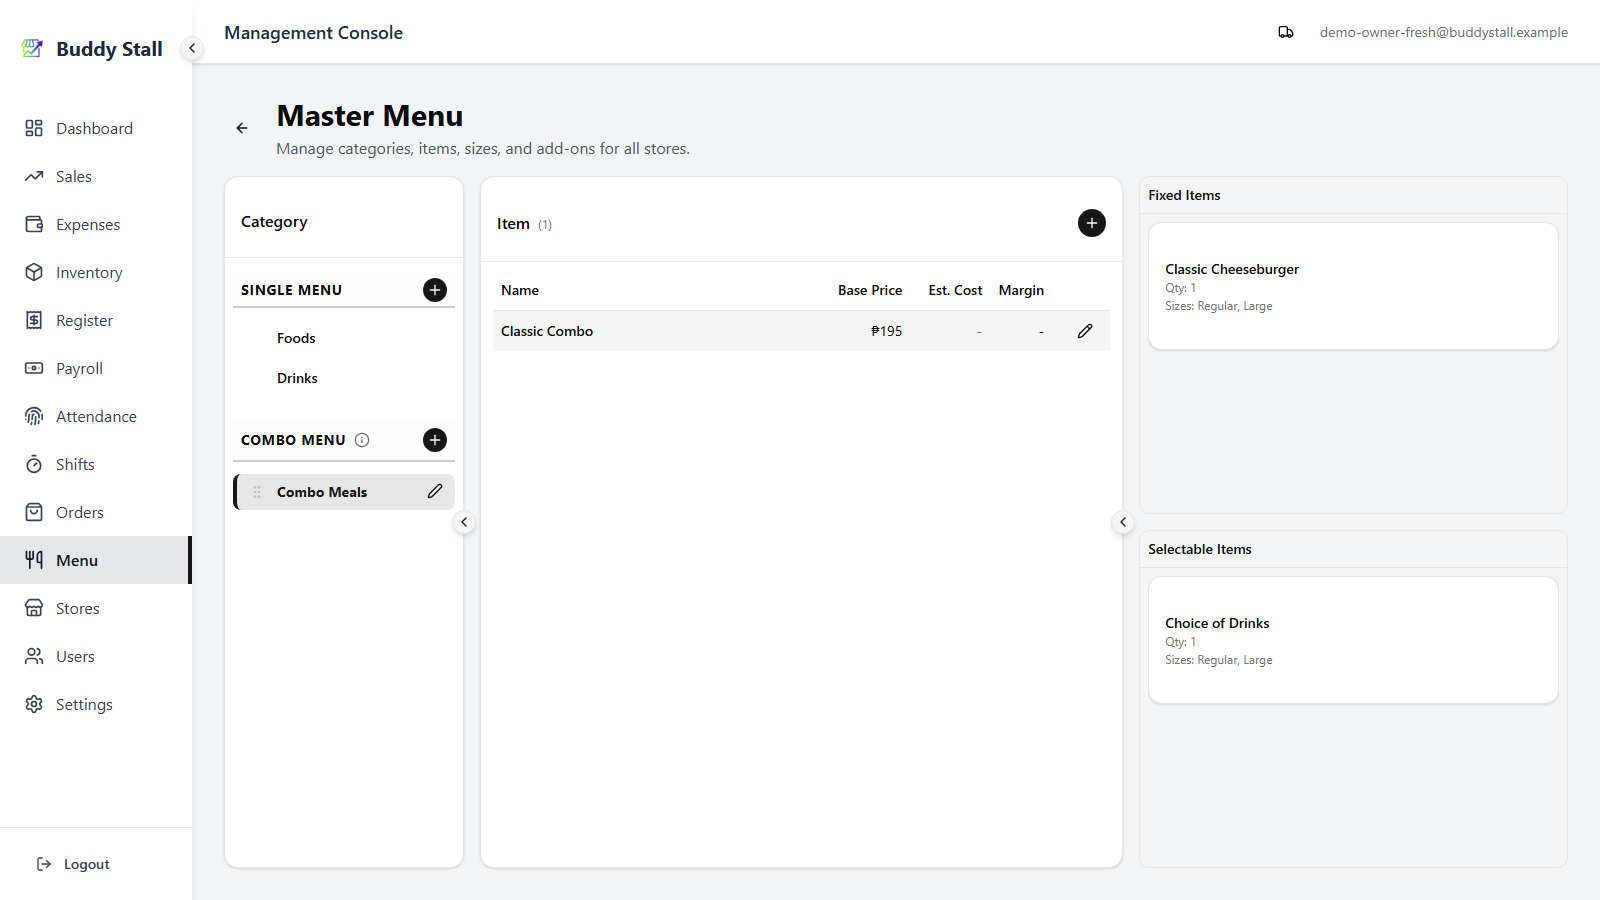 12
121 Fixed Items — components that always come with the combo. Each entry is a specific master item with a quantity (e.g. Classic Cheeseburger × 1).
2 Selectable Items — components the customer chooses from at the POS. Each entry is a whole category with a quantity (e.g. Choice of Drinks × 1 — the customer picks any item from the Drinks category).
Archiving and deleting
Items, categories, sizes, and add-ons you no longer use can be archived — hidden from the lists without being removed. Archiving keeps the link to past sales intact, which makes it the safer choice for anything that has ever been sold.
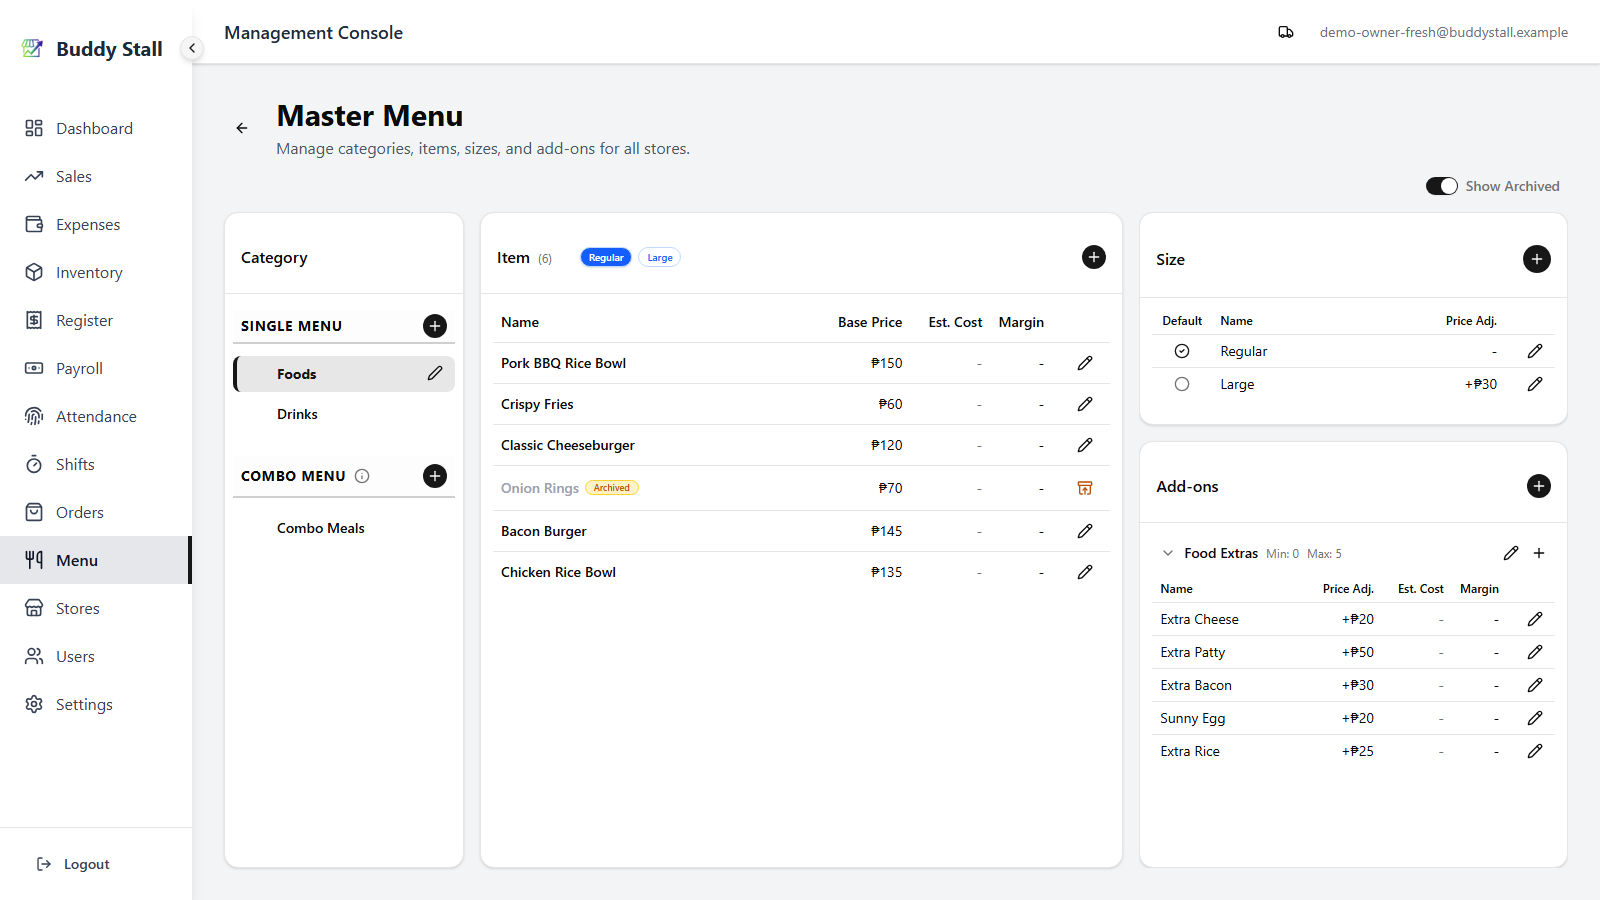 123
1231 Show Archived toggle — at the top-right of the master menu. Only appears when at least one row is archived. Flip it on to see archived rows mixed in with the active ones.
2 Archived row — dimmed and grayed, with an Archived badge next to its name. It does not appear at the POS.
3 Restore — replaces the edit pencil on archived rows. Click it to bring the row back to active.
Deleting
An item that has never been sold can be deleted outright from its edit dialog (trash icon), which also removes its recipes and set components. If you try to delete an item that has sales history, the dialog offers Archive instead — that hides it from the lists while keeping past sales records intact.
Read next
Store menu
Set what each store shows and what it charges.
Set up recipes
Link menu items to the ingredients they use, so sales deduct stock automatically.
Set up your menu
The guided walkthrough for building your catalog from scratch.
Everything below applies only once your store has joined a franchise. These features stay hidden until you connect, so a single, unconnected store can stop here. See Joining a franchise.
Items from a franchise preset
Part of this catalog can come from the franchisor's preset — whole categories, items, sizes, and add-ons loaded in from Settings → Franchise Connections. Preset rows carry a franchise badge, and the franchisor may lock some of their fields, just as it does for inventory. You can still build your own items alongside them, and you re-pull the franchisor's updates from Settings. See Joining a franchise for the full flow.