
Inventory master
The master inventory is the owner-wide list of the ingredients your business buys. Each entry carries a name, unit, cost per unit, and low-stock threshold — defined once for the whole business. Every store picks up the items it carries from this list and keeps its own running count — see Store inventory.
Adding one here is also what makes it something every store can order and record as an expense.
The screen
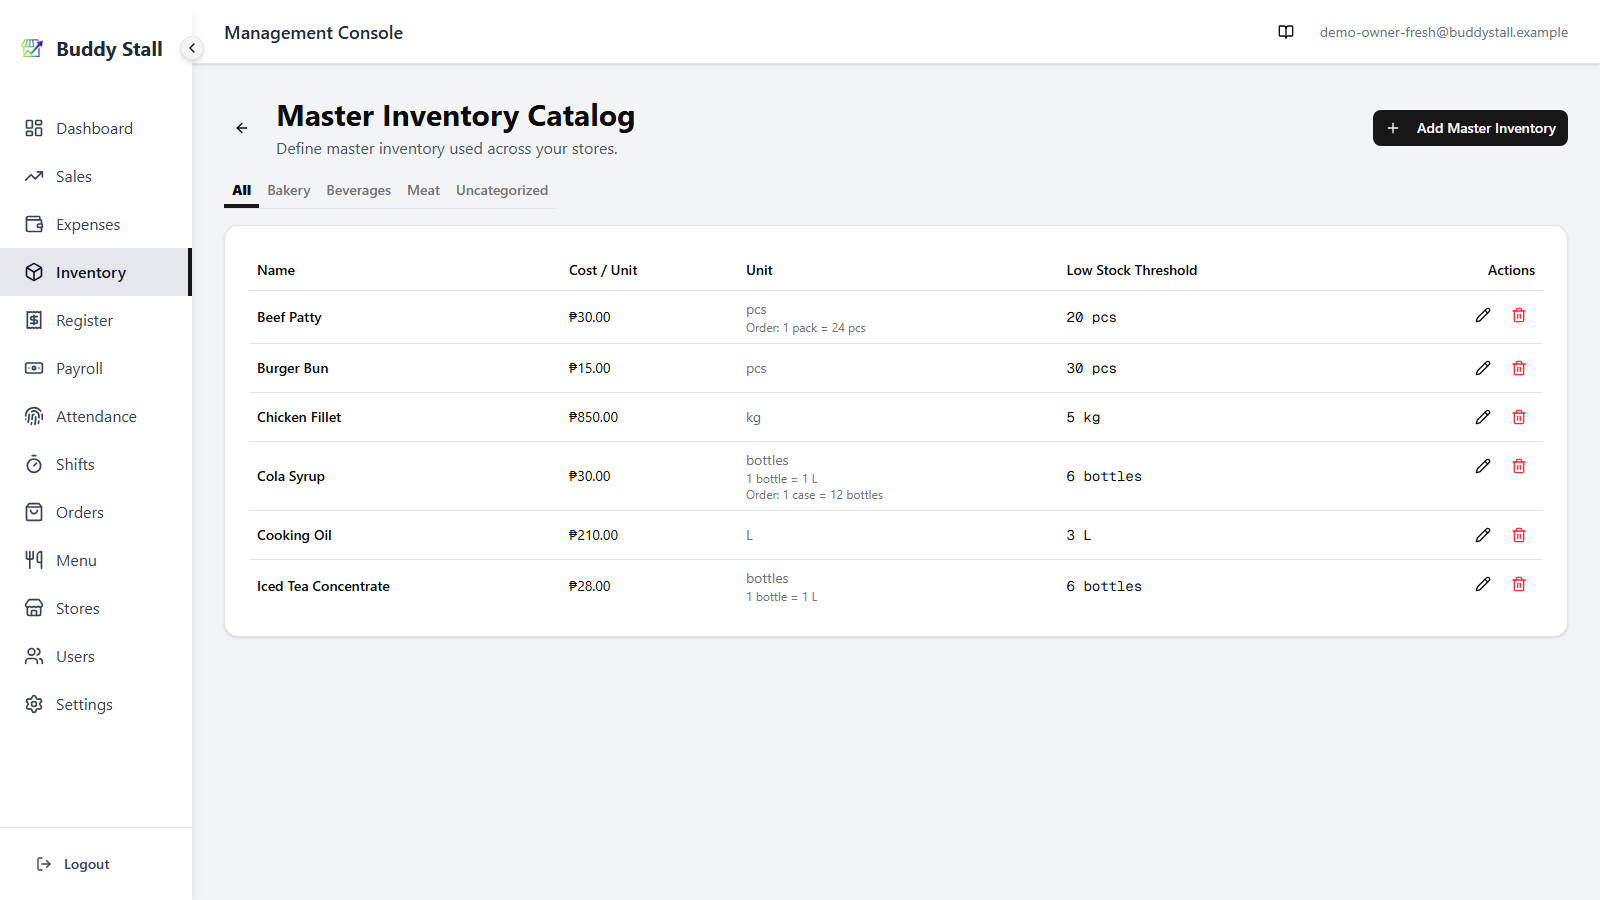
A list of every master inventory item, with an action button to add a new one and — once you start tagging items — a row of category tabs above the table. Items are sorted by name within the active tab.
 1234567
1 Add Master Inventory — opens a dialog to create a new ingredient. See Add or edit an item below.
2 Category tabs — filter the list to one category. The bar appears only once at least one item has a category. See Organize with categories below.
3 Name — how the ingredient is referred to across the app (e.g. Beef Patty, Cola Syrup).
4 Cost / Unit — the price you pay per unit of this ingredient. Used to value waste and expected expenses.
5 Unit — how the ingredient is counted: kg, g, L, ml, pcs or a packaging unit such as packs, cans, bottles, cases. When an item also records its content or an order unit, those appear as small sub-lines here — e.g. 1 bottle = 1 L and Order: 1 case = 12 bottles. See Add or edit an item for how to set them.
6 Low Stock Threshold — the level a store's stock of this ingredient has to fall below before it flags on the inventory screen. Set it high enough that you have time to re-order before the store actually runs out.
7 Edit / Delete — the pencil opens the edit dialog for that row; the red trash icon starts the delete flow (see Deleting an item below).
Organize with categories
Once a catalog grows past a handful of ingredients, categories keep it manageable. Each item can carry an optional category — Meat, Beverages, Bakery — and the catalog then shows a tab bar so you can jump to one group at a time.
- All — every item; the default view.
- One tab per category — sorted alphabetically.
- Uncategorized — items with no category. Shown only when at least one item is uncategorized.
The tab bar appears only after you tag the first item — an all-uncategorized catalog stays a plain list. Categories are free text: you assign them in the Add / Edit dialog (below), and the Category field suggests names you have used before so they stay consistent. Switching tabs filters the list in place — it never reloads or changes your data.
Add or edit an item
The Add Master Inventory button and the per-row edit pencil both open the same dialog. Only Name and Unit are required; everything else is optional. Fill in the fields and save.
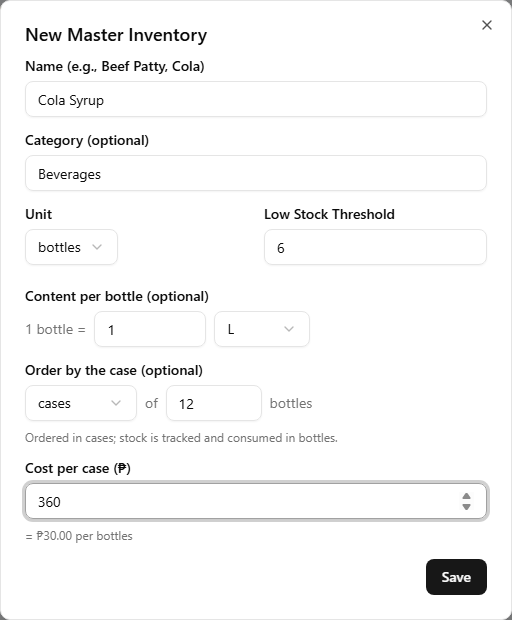
- Name — required. The label shown everywhere in the app for this ingredient.
- Category — optional. A free-text group (e.g. Beverages) that drives the catalog's category tabs. Leave it blank to keep the item Uncategorized. The field suggests categories you have used before.
- Unit — required. The unit stock is counted and consumed in.
- Low Stock Threshold — optional, defaults to 5. The quantity — in the stock unit — a store's stock has to fall below for the inventory screen to flag this ingredient as low.
- Content per unit — optional; packaging units only. How much one unit holds (e.g. 1 bottle = 1 L); the dialog labels it with the real unit, e.g. Content per bottle.
- Order unit — optional. A coarser unit you buy in (e.g. a case of 12 bottles); the label becomes Order by the case once you pick one.
- Cost — optional but recommended. Without it, waste and expected-expense calculations cannot be valued in money.
Unit, Content per unit, and Order unit all describe how the ingredient is measured but answer different questions — the next section explains how they differ and when to use each.
How an ingredient is measured
Three of the dialog's fields control measurement — Unit, Content per unit, and Order unit. They are easy to confuse because all three talk about "units," yet each answers a different question:
- Unit (required) — what do you count stock in? (e.g. bottles). Every item has one.
- Content per unit — what is inside one stock unit? (e.g. 1 bottle = 1 L). Set it for packaging units you sometimes restock by their contents.
- Order unit — how do you buy it in bulk? (e.g. 1 case = 12 bottles). Set it when you count in one unit but purchase in a coarser one.
Unit — the stock unit. The unit the ingredient is counted, stored, and consumed in — and the only one of the three that is required (every item has one).
- Used everywhere — stocktakes count in it, recipes deduct it on every sale, waste is logged in it, and the Low Stock Threshold is measured in it.
- Two families — a base unit (kg, g, L, ml, pcs) to track a raw measure directly, or a packaging unit (packs, cans, bottles, containers, rolls, pouches, boxes, cases) to count whole containers.
- Pick what you count on the shelf — it cannot be converted later, so a count of "12" stays "12" even if you change the unit.
Content per unit — what one unit holds. Optional; shown only when the unit is a packaging unit. It records the contents of one stock unit in a base measure, e.g. 1 bottle = 1 L.
- Easier restocking — when you add the paired expense you can enter the delivered quantity in either the stock unit (bottles) or the content measure (L), and the app converts: type "18 L" and it stores the right number of bottles.
- Also a catalog sub-line under the Unit column.
- Use it when an item is counted in whole containers but invoiced by its contents; leave it blank when a unit has no meaningful inner measure (you just count pcs of buns).
Order unit — your purchase unit. Optional. Use it when the unit you count is finer than the unit you buy: set the order unit (cases) and how many stock units one holds (12 bottles).
- Ordering & receiving happen in the order unit; restock converts the received amount into stock units automatically (2 cases → 24 bottles). Stock is still tracked and consumed in the stock unit.
- Cost switches to the order unit price (Cost per case) and derives the per-stock-unit cost for you (₱360 per case → ₱30 per bottle).
- Leave it blank when you buy in the same unit you count in — the common case.
Content per unit looks inside one stock unit (1 bottle → 1 L), while an order unit groups several stock units into a purchase pack (1 case → 12 bottles). They are independent: an item can use either, both, or neither.
Deleting an item
The red trash icon on each row opens a confirmation dialog that first checks where the item is in use: store inventories, product recipes, and add-on recipes.
- Not in use anywhere — the dialog confirms it is safe to delete and lets you proceed. The paired master expense item is removed at the same time.
- Registered in a store, or linked to a franchise — it cannot be deleted, because real stock records point at it. The dialog names the stores and offers Archive instead, right there. You do not have to un-register it from anywhere first.
- Used in a recipe — this is the one case you have to clear yourself. The dialog lists the products and add-ons that consume the ingredient and offers no Archive, because a recipe left pointing at a hidden ingredient would silently stop deducting stock. Take it out of those recipes, then delete or archive.
- Franchisor-exclusive — neither deleting nor archiving is possible. The franchisor keeps these fixed in every store; see Connect & sync a franchise.
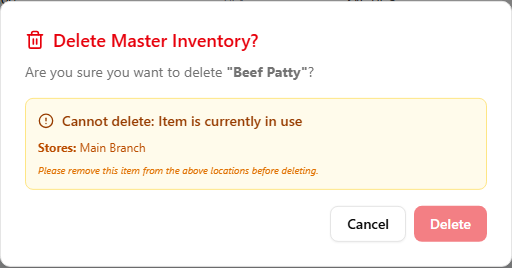
Archiving instead of deleting
Deleting is for an ingredient that was a mistake or was never really used. When you simply stop carrying something you have real history with, archive it instead. An archived item drops out of the working catalog but keeps every past purchase, stocktake, and cost entry pointing at it, so your reports for earlier periods still add up.
Archived items are hidden by default. Use the Show Archived toggle in the category-tab row to bring them into view: they appear dimmed and badged Archived, and each one offers Unarchive to put it back into the active catalog. The toggle only appears when you actually have archived items, so an untouched catalog stays uncluttered.
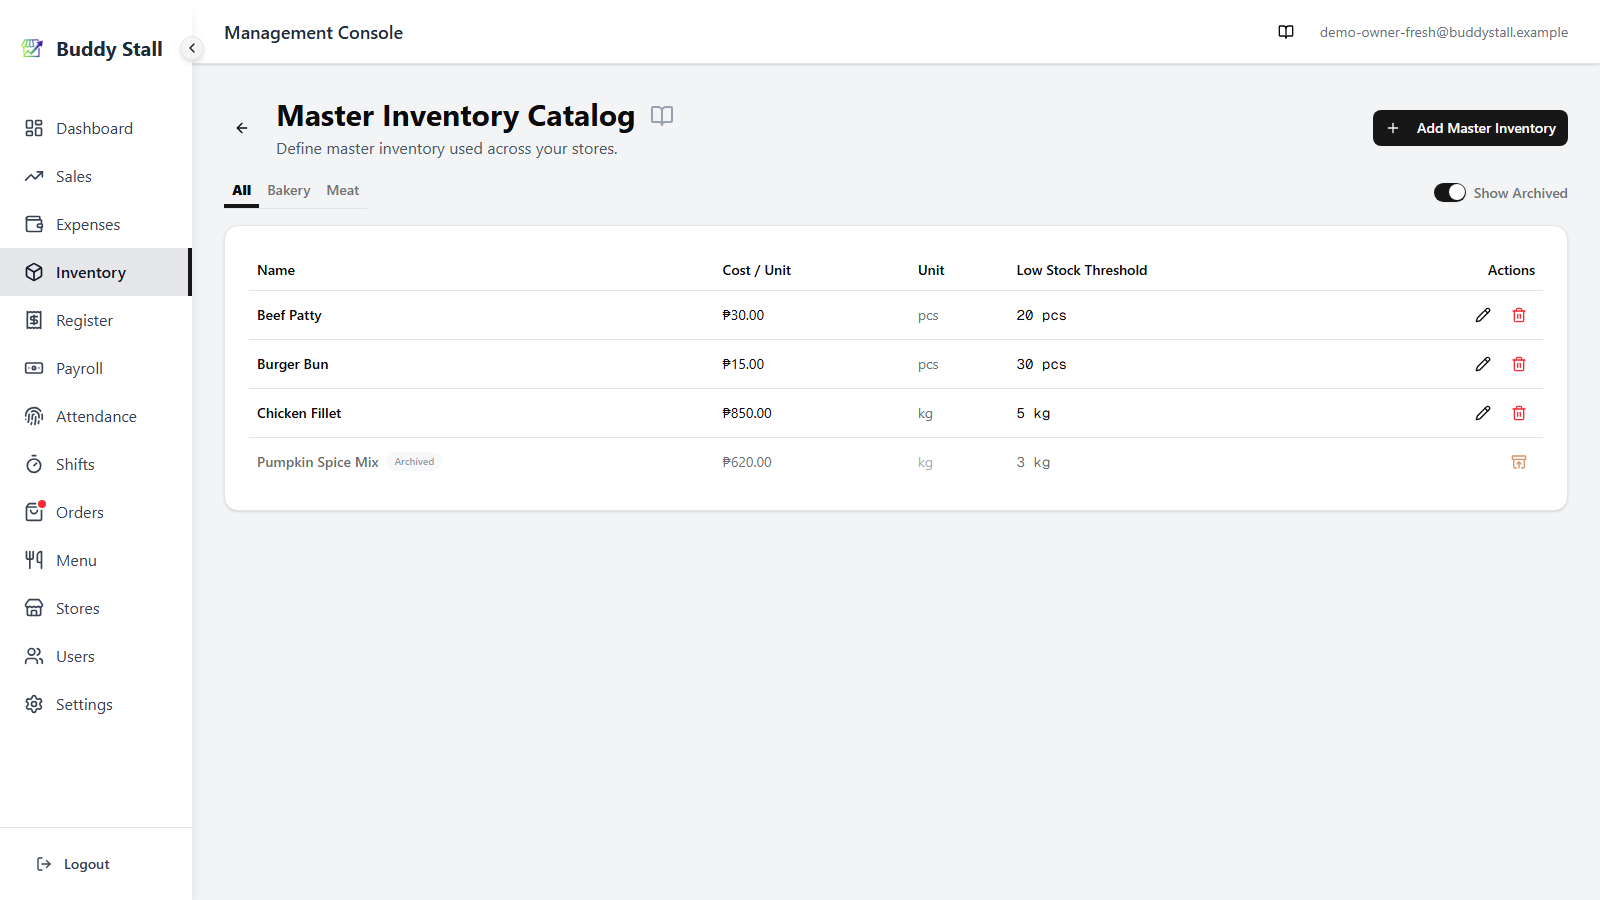
One thing still blocks archiving: an item wired into a recipe. Because the recipe would be left pointing at something no longer in the app, take the ingredient out of its product and add-on recipes first, then archive it. Note this is a narrower bar than deleting — archiving does not require you to un-register the item from your stores first, since their counts and history are exactly what archiving is meant to preserve.