
Stocktake & waste
The StockHouse tracks an expected quantity for every item, built up from purchases coming in and shipments going out. That figure is only ever as good as your last physical count. A stocktake is what reconciles the expected number against what is actually on the shelf; logging waste is what you do when stock is gone but was never shipped anywhere — spoiled, spilled, or thrown away.
Neither has a dedicated screen. Both are row actions on the Inventory list — this page walks through the two dialogs they open and how to read the numbers inside them.
1. Open the Inventory list
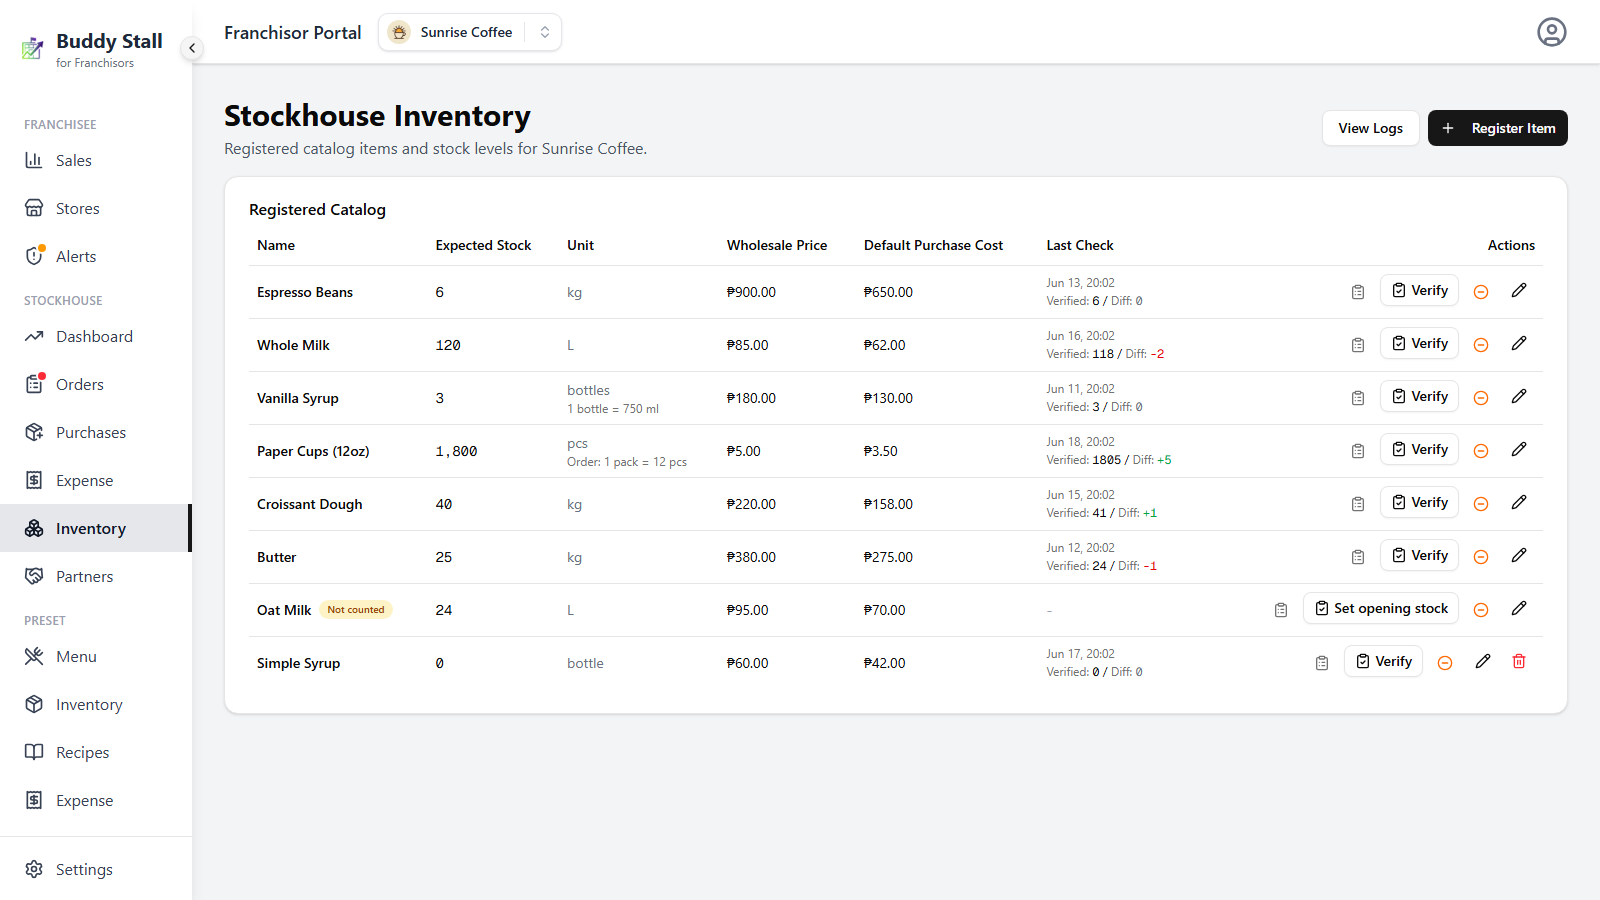
Open the franchise, then go to StockHouse → Inventory. Each row ends with a strip of action buttons on the right — everything on this page runs from the highlighted ones:
 1234
12341 View History — opens the item's list of past counts; see Reading a variance below.
2 Verify — runs a stock count against the expected figure.
3 Log Waste — the orange action; records stock that was spoiled, spilled, or thrown away.
4 Set opening stock — what the Verify slot reads until the item has been counted once (note the amber Not counted pill beside the name). That first count is where every item starts.
The other actions on the strip — the pencil Edit and the trash Unregister — are catalog upkeep, covered on the Inventory page.
2. Set the opening stock (first count)
Until an item has been counted once, its row carries an amber Not counted
pill and the row action reads Set opening stock instead of Verify.
Click it to open Set opening stock: {item}.
This dialog is simpler than the regular count on purpose — there is no variance block, because there is nothing yet to compare against. It explains that "this is the first stock count for this item. It establishes the opening balance and enables variance tracking going forward." What to do here is simple: count the stock you physically have right now, enter that number as the Opening Quantity, and save with Save opening stock.
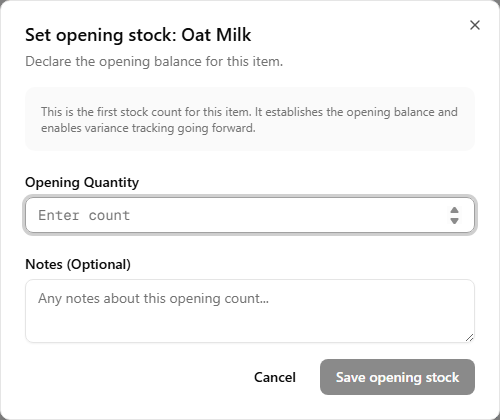
Do this for every item as soon as you register it to the StockHouse. Before an opening count exists, no variance figure means anything — there is nothing to measure the physical count against yet.
3. Verify a count
Once an item has a baseline, its row action reads Verify and opens
Report Inventory: {item}. Above the input sits a variance block built
from the item's activity:
- Last Report: the date of the previous count, with a quantity chip — or Never.
- Purchased: +N, Shipped: -N, Waste: -N.
- a bold Expected Stock:, the number the physical count is being checked against.
Below that, enter the Actual Quantity you counted — a ±N Diff readout updates live as you type — and an optional Notes field for the reason. Submit Report saves the count.
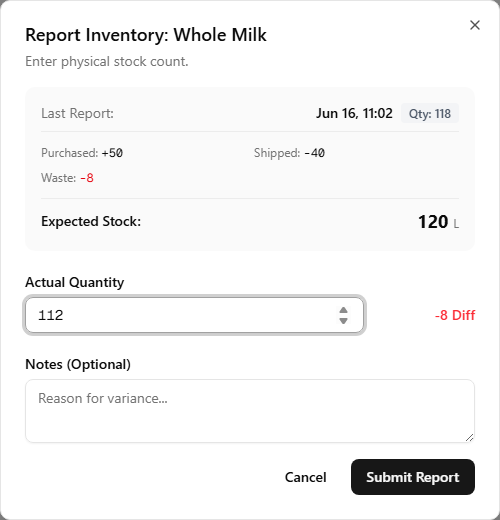
These three figures are not lifetime totals — they cover only what happened since the last report on this item. Earlier activity, and earlier corrections, are left out on purpose, so the block always reads as "what should have changed since I last looked."
A difference is logged as a correction
What Submit Report writes depends on whether your count matched:
- If the counted quantity matches the expected figure, nothing is written to the inventory log — there was no discrepancy to record.
- If there is a difference, the gap is written to the Inventory Logs as a Correction entry, dated at the moment of the count and signed like the Diff readout. That entry is what moves the book stock to the counted quantity — and it stays in the history as the permanent record of the adjustment.
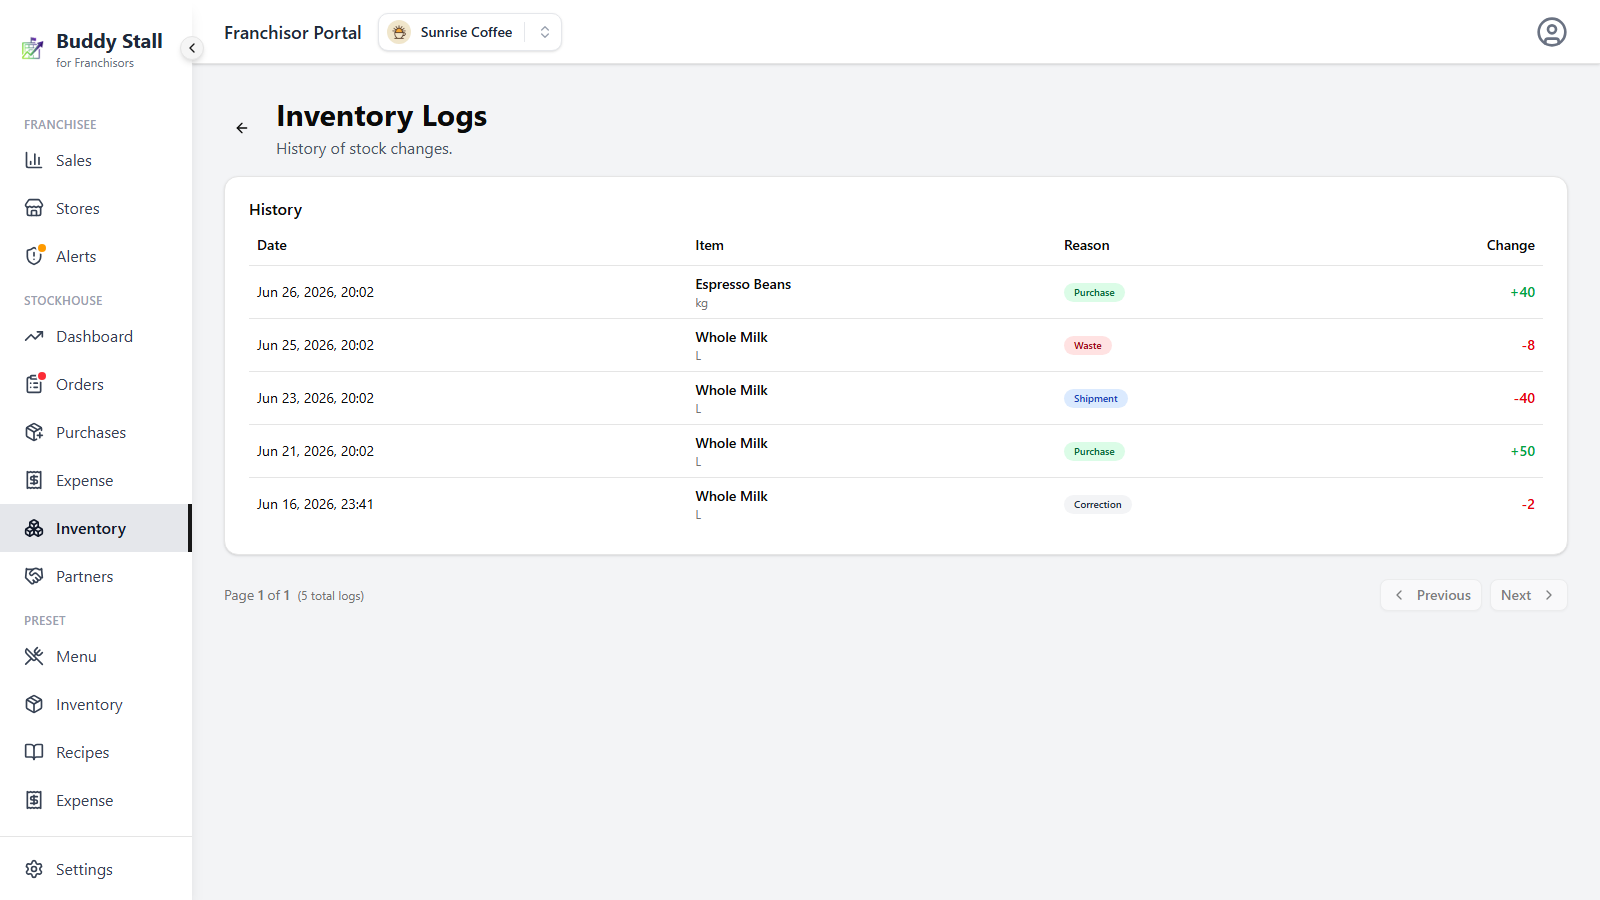
Open the log from the View Logs button at the top of the Inventory list. See the StockHouse overview for what each log reason means.
Reading a variance
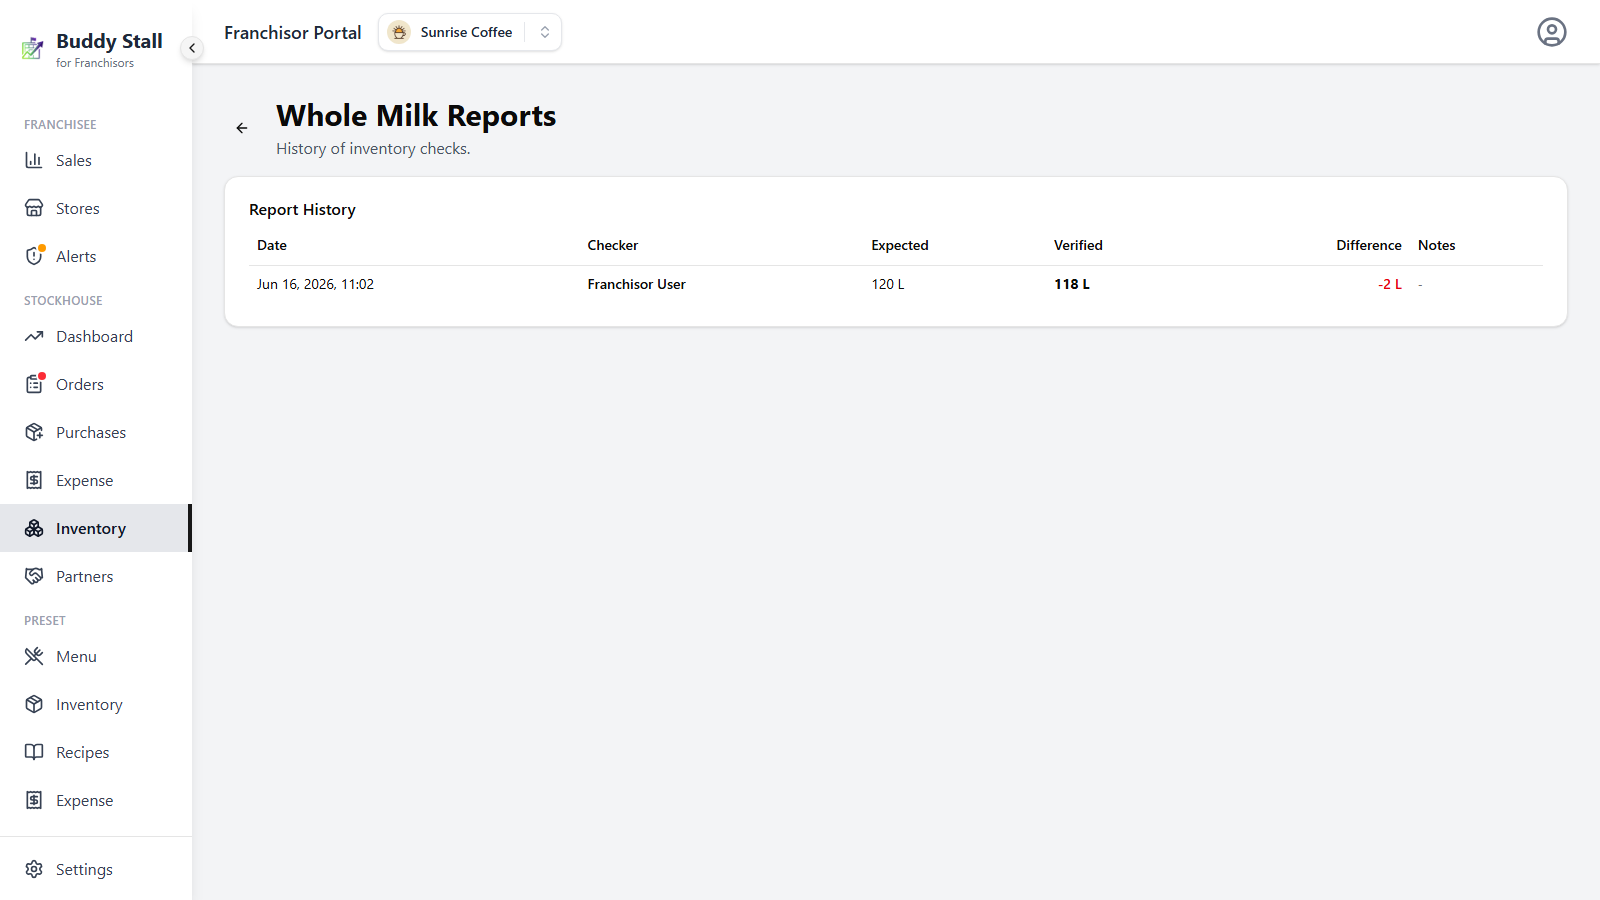
A negative difference means less stock than the app expects: a shipment that went out unrecorded, breakage, or a miscount. A positive difference usually means a purchase or a return that never made it into the system. Whatever the cause, write it in Notes — that note is what the item's report history shows later, and an unexplained variance is much harder to investigate after the fact.
Click View History on any row to open {Item} Reports, listing every
past count with its Date, Checker, Expected, Verified,
Difference, and Notes.
4. Log waste
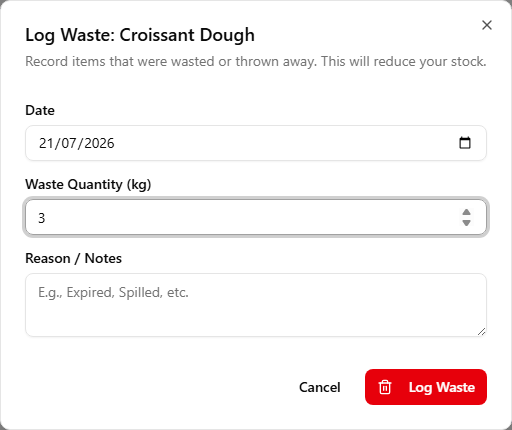
The orange row action opens Log Waste: {item}: "Record items that were
wasted or thrown away. This will reduce your stock." It takes a Date, a
Waste Quantity ({unit}), and Reason / Notes (e.g. "Expired,
Spilled"). The destructive Log Waste button saves it.
Logging waste does two things at once: it reduces stock with a waste log
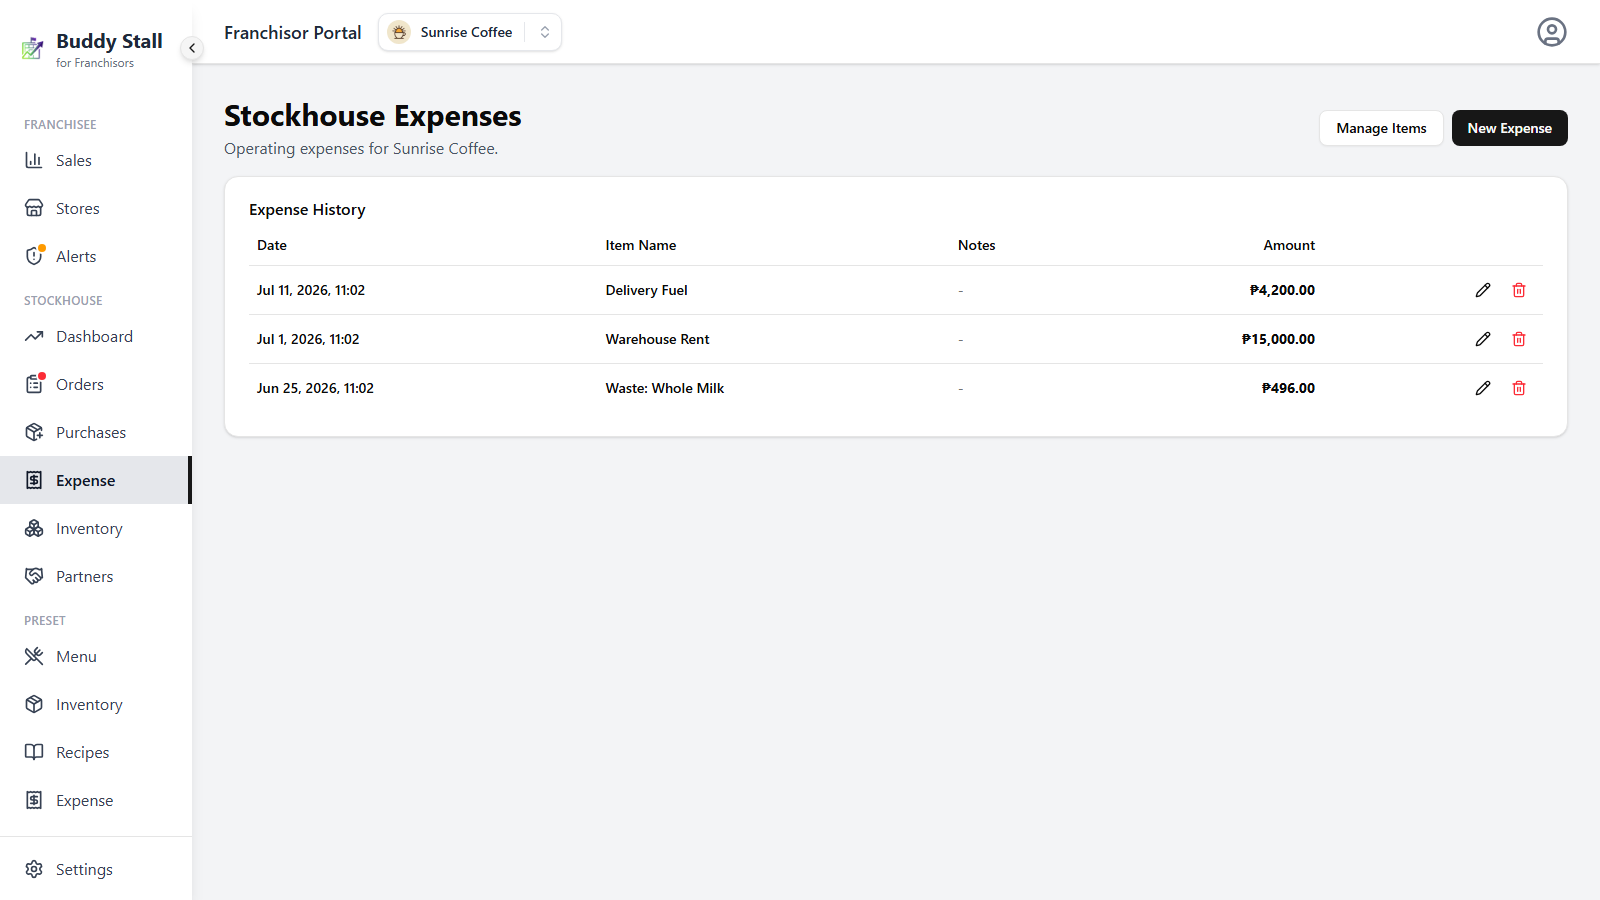
entry, and it automatically creates a linked StockHouse expense named
Waste: {item name} on the date you chose, keeping the loss visible as a
costed record in your expenses. The two stay tied together. On the Expenses screen that
row opens an Edit Waste Record dialog where only the date and
notes can change — the amount is derived from the quantity and cost and
is read-only — and moving the date moves the linked stock entry with it.
Deleting the waste record puts the stock back, reversing the deduction.
So to undo a waste entry, delete it from the Expenses screen; you do not fix
it by hand with a separate count.
This is what that looks like — right after logging waste, a Waste: {item}
row sits in the Expense History alongside the manually entered expenses:
The expense is valued at the item's Default Purchase Cost. If that is not set, it falls back to the preset's wholesale cost per unit, and if neither is set it is recorded at zero — which quietly makes the waste look free. Set a Default Purchase Cost from the item's Edit action on the Inventory list before you expect to log waste against it.
This expense exists for waste management — putting a cost figure on what you threw away — not for the profit math. The loss is already carried by the stock deduction, so on the Dashboard waste expenses are excluded from the cost and profit totals on purpose (counting them there would charge the same loss twice). They appear only in the expense composition chart, folded into a single Waste slice, so you can watch what share of your spending waste represents over time.
Waste vs. a negative stocktake correction
Both reduce stock and both leave a trail, but they answer different questions:
- Log waste when you know stock was destroyed, expired, or thrown away. It is dated, costed against the item, and leaves an expense record — the right choice whenever you can point to a cause.
- Use a stocktake correction when stock is simply missing and you cannot explain why. It fixes the count without claiming a cost, which is more honest than logging waste for a loss you cannot actually account for.
Only waste puts a cost figure on the loss — as a tracking record on the Expenses screen and a Waste slice in the Dashboard's expense composition chart; a stocktake correction only ever changes the count.